Installing WordPress On DreamHost With Their One Click Installer

I used Blogger for many years but I have now found that WordPress is easier to use and has a more intuitive interface than Blogger.  I kept my Blogger blog going until I was happy with my new WordPress set up and then transferred my blog from Blogger to my website with WordPress installed on it.

This tutorial is for people with an intermediate level of computer skills.  I am only showing you the basic settings here which I used to install WordPress for this blog.'computer' photo (c) 2008, ph0rk - license: http://creativecommons.org/licenses/by-sa/2.0/
If you choose to have DreamHost host your website then this is how to install the WordPress blogging software using DreamHost’s one click installer.

Once you have signed up for a DreamHost account and registered your chosen domain name you will receive an email from DreamHost with details of how to access your website’s Administration Panel shown below.

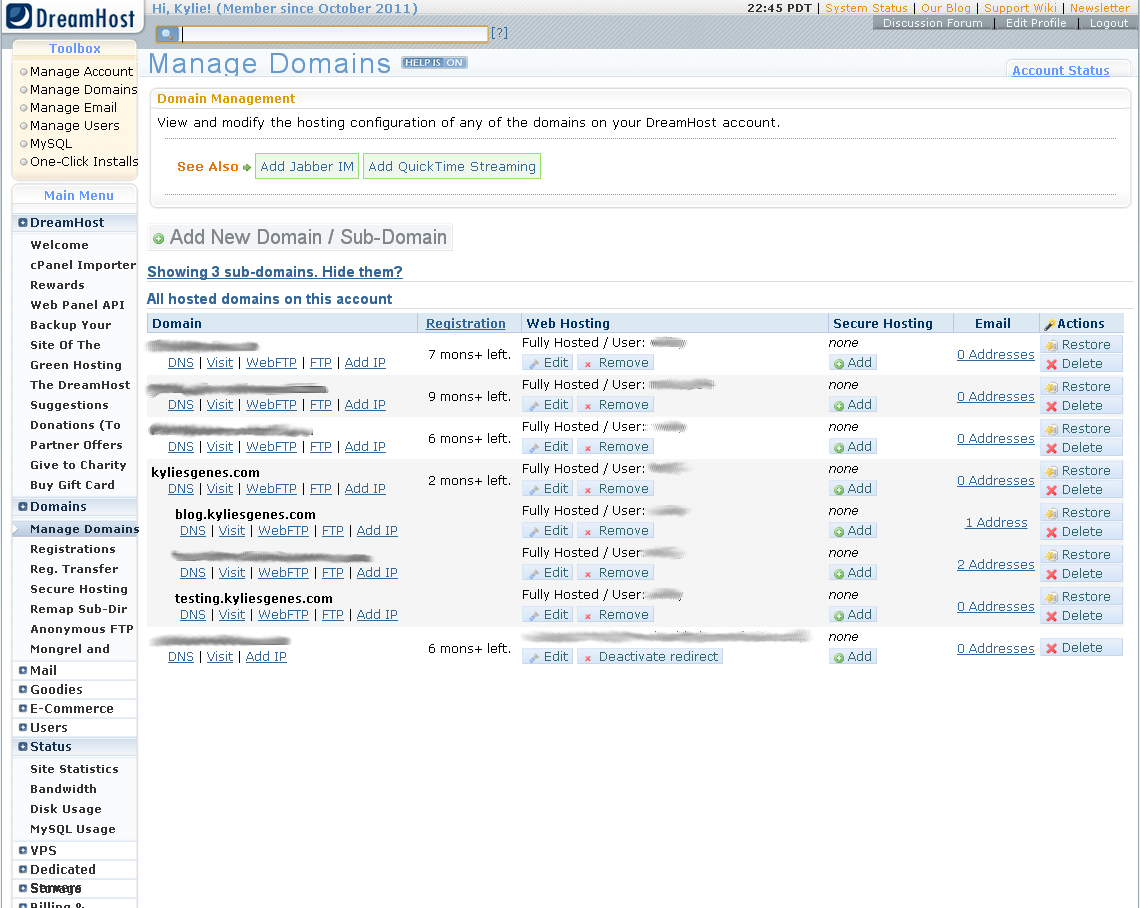
screenshot of DreamHost administration panel

Screenshot of DreamHost administration panel


Log in to the administration panel. In the above picture you can see that I have a number of domain names which I’ve blanked out and I’ve just left www.kyliesgenes.com visible. I created a sub domain called www.blog.kyliesgenes.com and this is where I installed the WordPress software. It is a good idea to do this so that you can install other databases or software packages in the top level domain. In the administration panel under Manage Domains where it says Add New Domain/Sub-domain click it.


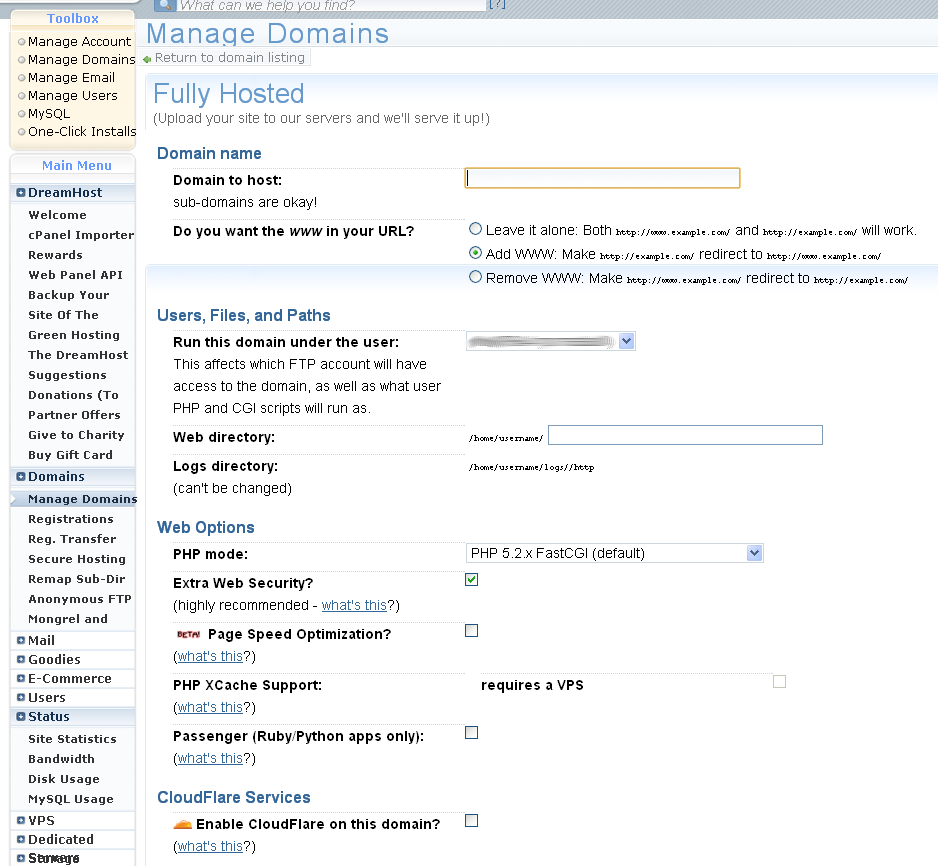
screenshot of DreamHost create a sub-domain


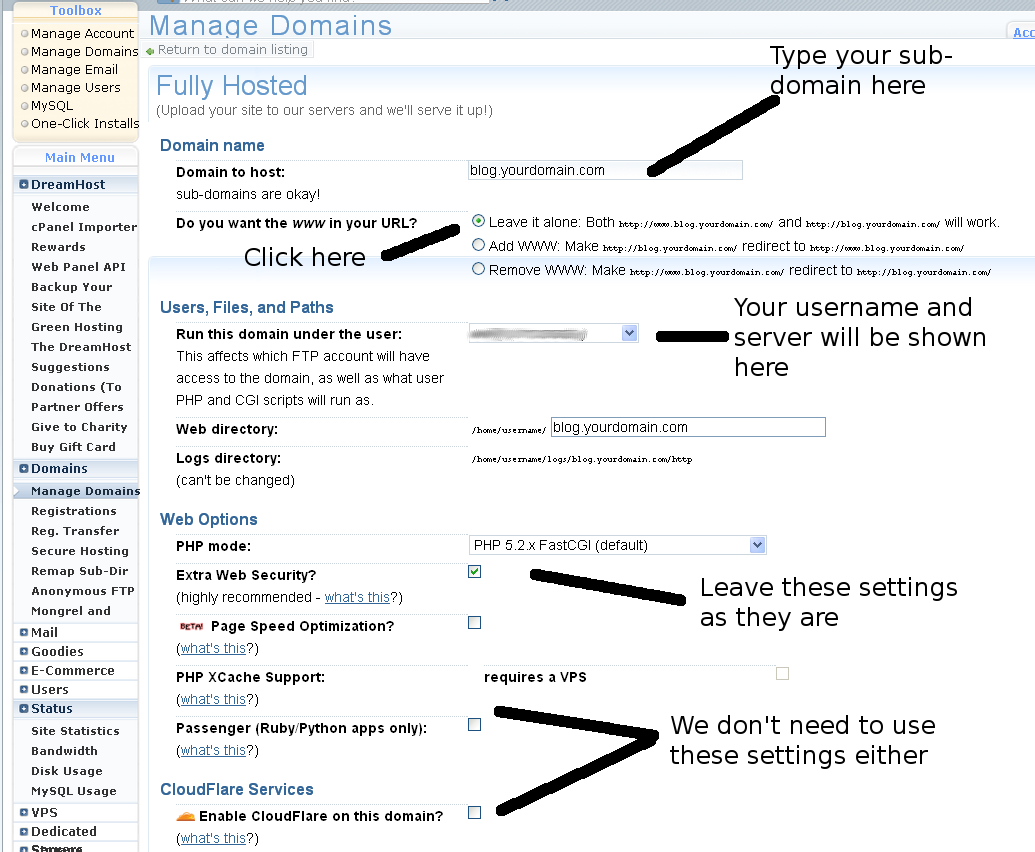
Type in the sub-domain you have chosen. You may like to call it www.blog.yourdomain.com.


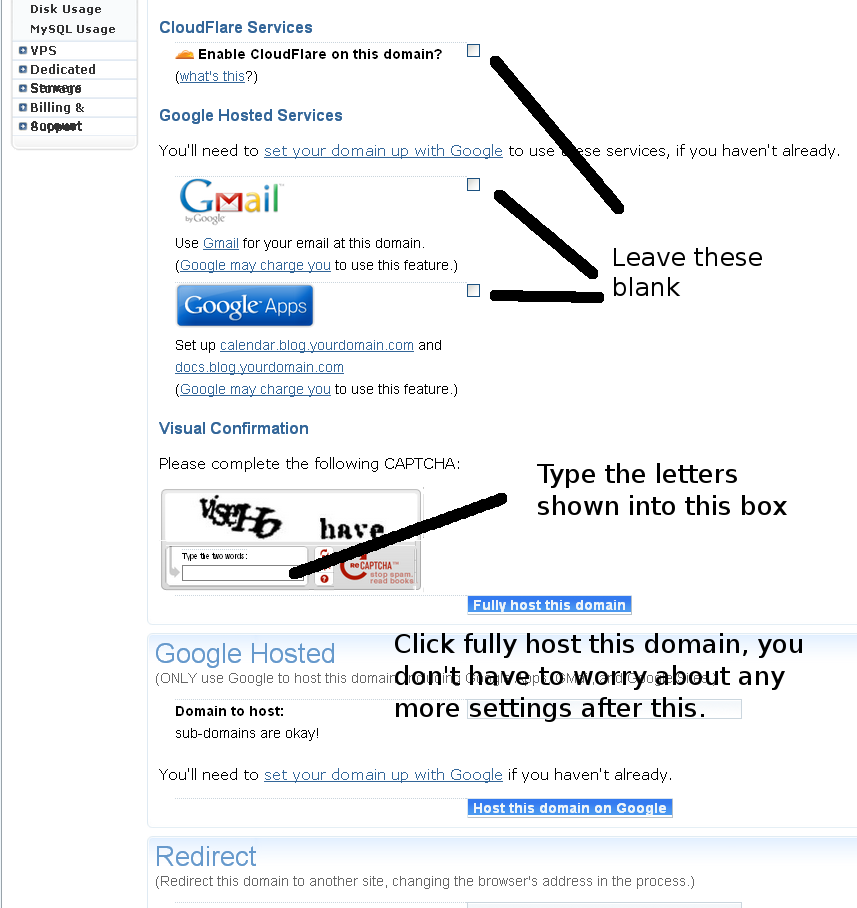
Sub-domain settings

Instructions for setting up a sub domain


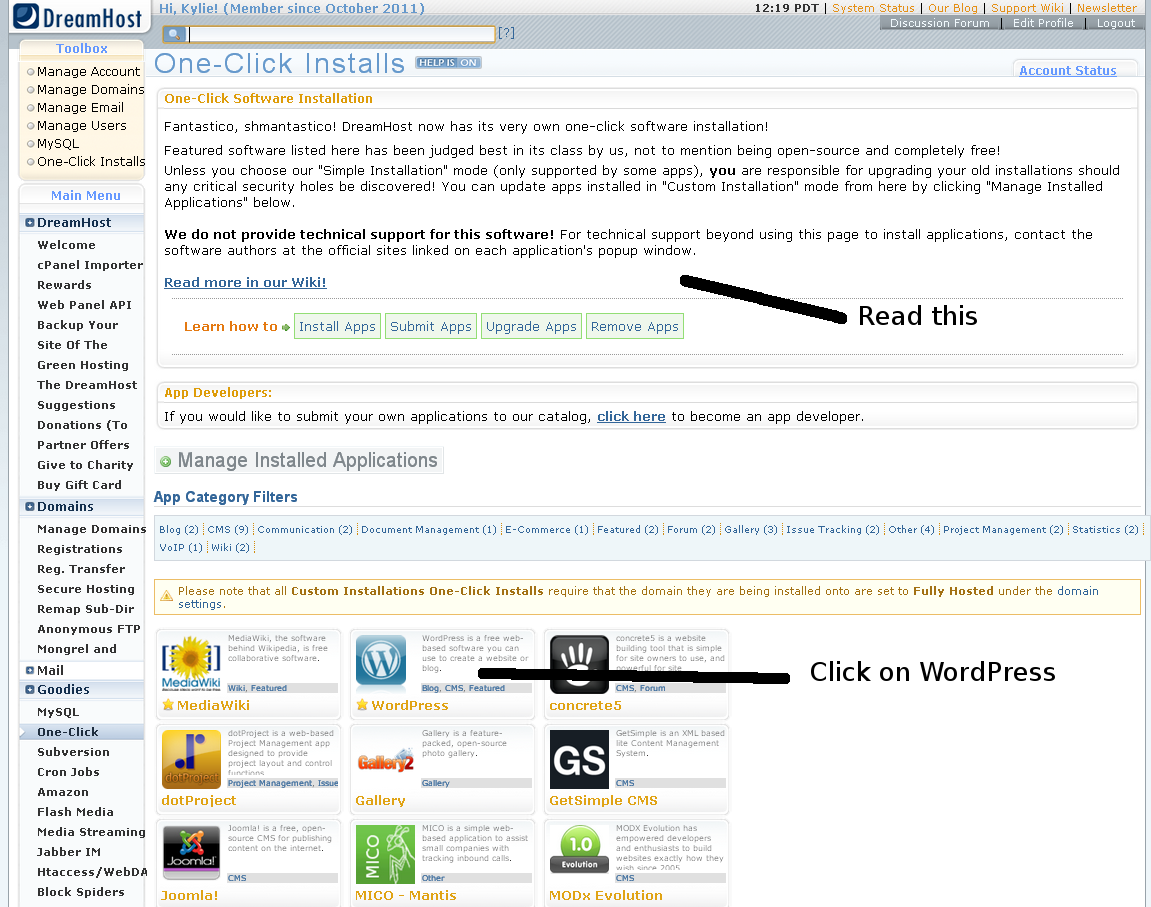
There may be some time to wait for these changes to take effect. Once it shows in your DreamHost administration panel that everything is ready to proceed then you can go on to installing WordPress. In the top left hand corner of the screen is the Toolbox, click on One Click Installs.


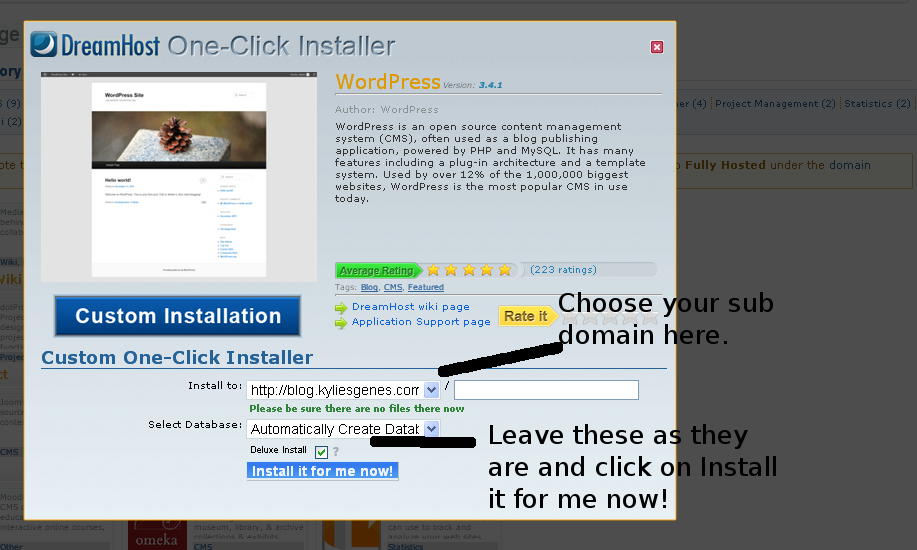
DreamHost's one click installer


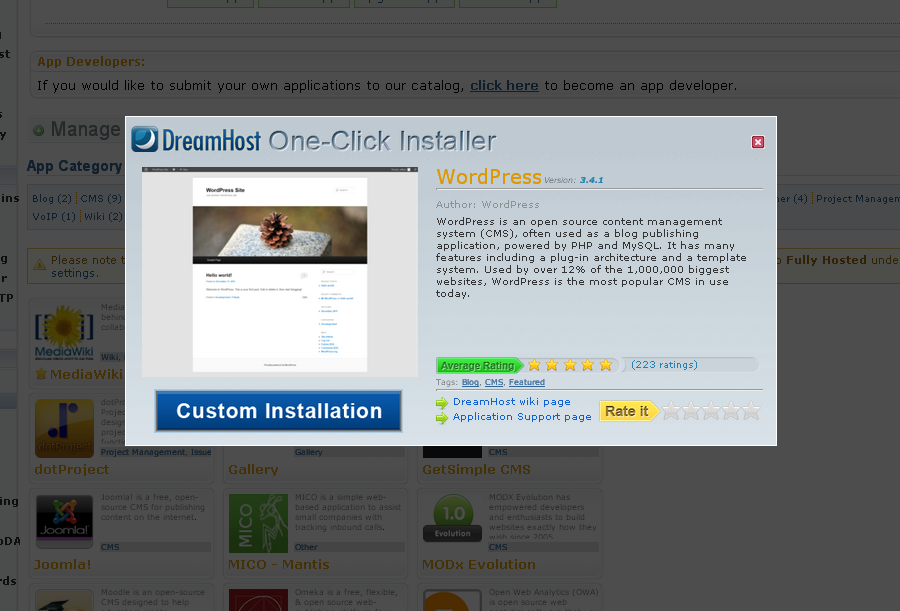
Begin WordPress installation


Choose sub domain


Once WordPress is installed you will receive an email with instructions on how to choose your theme and start blogging.
Benefits Of Having Your Blog On Your Own Website

The benefits of having your blog on your own website are similar to the benefits of having your own website which I listed in my last post. Having your blog on your own website means;

  • you get to choose the blogging software you use
  • you choose the URL of your blog
  • it is more customisable than a free site
  • there are no ads unless you choose to have them
  • you are promoting yourself and your ‘blogging name or business name’ more fully
  • you can back up your blog regularly
  • you are the owner of the content you create – your writing, photos etc.

I use the WordPress blogging software for this blog.  I installed it myself and yes I am a bit of a computer geek but it really isn’t very hard to install.  One of the reasons I love and use WordPress is because I am a supporter of Free and Open Source Software.  Here is a blurb about WordPress.

WordPress is Free and open source software, built by a distributed community of mostly volunteer developers from around the world. WordPress comes with some awesome, worldview-changing rights courtesy of its license, the GPL.

  1. You have the freedom to run the program, for any purpose.
  2. You have access to the source code, the freedom to study how the program works, and the freedom to change it to make it do what you wish.
  3. You have the freedom to redistribute copies of the original program so you can help your neighbor.
  4. You have the freedom to distribute copies of your modified versions to others. By doing this you can give the whole community a chance to benefit from your changes. 

'Ich bin ein Blog' photo (c) 2009, Karola Riegler - license: http://creativecommons.org/licenses/by-nd/2.0/
What do you feel are the stumbling blocks to having your blog on your own website?

My next blog post will be, “Installing WordPress On DreamHost With Their One Click Installer”.

Also thanks goes to Fi from Dance Skeletons. Fi uses Wylio – Free pictures for Bloggers on her blog and I was so impressed with her pictures that I had a look at it and decided to use it myself. Wylio provides you with free from cost and free from copyright pictures to use on your blog and it includes attribution to the creator of the picture. A very nice, handy tool.